Key Takeaways
- Any family picture can be transformed into a personalized artwork.
- The quality of photos has a direct effect on the end result.
- The size of the canvas must correspond to the complexity of the picture.
- Every custom kit includes everything needed to get started.
- Correct sealing and framing ensure that your artwork is maintained over time.
- Personalized diamond paintings make meaningful gifts and keepsakes.
- The selection of the appropriate image aids in enhancing the quality of the final artwork.
Not all pictures are about pixels- they are about feeling, memories, and moments we wish to keep off the screen. It can be a quiet family moment, a picturesque view during a special holiday, or the face of a favorite pet, and some of these pictures need more permanence.
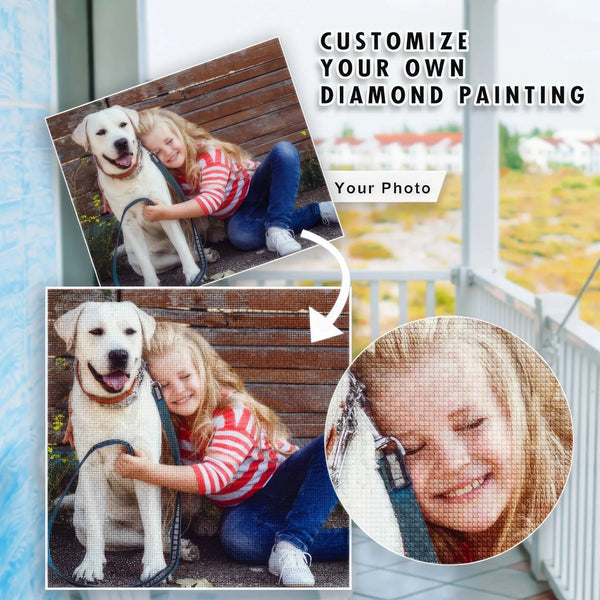
Custom diamond painting can provide a creative approach to recreating such memories. You simply lay the drills on a printed canvas and slowly form a textured copy of the photo- one that draws the eye and adds depth to the original picture.
It’s a rewarding process, both calming and creative. However, the result is usually initiated with a critical move: the photo itself. In case the picture is too dim, too unclear, or the composition is inadequate, the resultant artwork may fail to honor the memory.
It all depends on making a good choice.
Knowing how photos become diamond painting prevents disappointment and guarantees that the final piece shows the beauty of the moment it was painted.
Here is how to create the best look, so your canvas is as stunning as the original moment you captured in the image.
Table of Contents
- Step 1: Pick a High-Quality Photo
- Step 2: Upload and Order Your Custom Kit
- Step 3: Prepare Your Workspace and Tools
- Step 4: Follow Canvas by Numbers’ Four Core How-To Steps
- Step 5: Place the Diamonds with Precision and Patience
- Step 6: Inspect, Seal, and Secure
- Step 7: Frame, Display, and Share Your Creation
- Your Moment to Shine
- FAQ
Step 1: Pick a High-Quality Photo

The best way to ensure your custom diamond painting is amazing is to begin with a clear, close-up photo.
Images of high resolution (preferably 2,000 pixels or more on the shorter edge) are ideal, since they maintain fine detail when the picture is transformed into a pattern of shining drills.
If you have several people in your photograph, select a bigger canvas size. This gives more space where the facial features and expressions can be shown clearly. Conversely, smaller canvases are prone to losing detail, particularly in group shots.
Lighting contributes immensely to quality. Soft, natural light should always be sought, and direct sunlight or harsh shadows that obscure features or create contrast distortion should be avoided. Avoid heavy filters or over-processed photos, as this may interfere with the color accuracy during printing and the drill-matching process. Rather, choose bright, well-exposed pictures with clear lines and saturated, but natural colors.
People or pets in close-up portraits with a clear view of their eyes, smile, or fur yield the most dramatic results. Try to crop out cluttered backgrounds to concentrate on the subject, and in case of doubt, convert the picture to black and white. If it still looks sharp, then it is probably a very good candidate.
Ultimately, it’s clarity and composition that count more than complexity. Select an image that is emotional and detailed. It is the secret of transforming your memory into a glittering masterpiece.
Step 2: Upload and Order Your Custom Kit

Visit the Canvas by Numbers website and start customizing your kit.
You can begin by selecting the type of diamond and size you want. The larger sizes capture more details, and you have the option of round or square drills. Round drills are beginner-friendly and simpler to set up, whereas square drills give a smoother, tile-like effect that suits fine designs.
Such an in-built tool puts you in control of how your image will take shape on the canvas. Just click any icon to start editing and be careful to apply the changes you desire before proceeding.
This is an essential step in editing since it ensures your picture is clear, well-illuminated, and framed correctly before it is turned into a diamond painting. As soon as you are satisfied with the appearance of your image, place the order for your custom diamond painting kit.
Step 3: Prepare Your Workspace and Tools
Once your kit arrives, unpack it all:
- Pre-printed adhesive canvas
- Diamond bags sorted by code
- Applicator pen (or multi-placer), wax pad or gel
- Drill tray, tweezers, rolling pin, optional light pad
Prepare your working area on a flat, clean, and well-lighted surface. Natural light is optimal, but an LED light pad proves a worthy aid, especially with darker colors or miniature symbols. Prepare your tools and make sure that your working environment is clean of dust, moisture, or pet hair because these factors could disrupt your finished work.
Being prepared in advance helps you stay focused, make fewer errors, and have a pleasant diamond painting experience without distractions. The creativity process is even more rewarding when you have a comfortable and uncluttered setup.
Step 4: Follow Canvas by Numbers’ Four Core How-To Steps

Canvas by Numbers offers a four-step process, which is the foundation of a simple and enjoyable diamond painting experience:
Prep your canvas: Start rolling your canvas on a flat surface. To avoid curling around the edges, place some light objects over the corners or tape them. Keep the adhesive surface dust-free- this ensures that it is sticky.
Organize your drills: Each packet of diamonds of a given color has a label. Pour small portions into a tray and mark each part of the tray with the corresponding symbol. Arranging colors assists you in preventing confusion and makes your work quicker.
Peel selectively: Remove only a small amount of the protective film at a time. Put small portions in a tray and label each of the portions with its symbol. It is possible to separate the areas with parchment paper in order to leave the rest of the canvas intact.
Place your drills: Dip your applicator pen into wax to pick up diamonds. Then, one by one, paint each of them onto the corresponding symbol on the canvas. The simplest method is to start at one corner and cross in a systematic manner.
Discipline and persistence during this phase establish the tone for a satisfactory completion and help create the best custom diamond painting results.
Step 5: Place the Diamonds with Precision and Patience

The best part is now, when you have to put each diamond on the canvas and see your masterpiece take shape. Use the applicator pen and a small portion of wax, and pick up each drill and press it on the corresponding symbol on the canvas.
The following are some of the tips that will keep you on track:
- Work in small amounts to avoid smudging or becoming sticky.
- Follow the legend or color key, which is printed on the side of the canvas.
- Tweeze in hard-to-reach or overcrowded areas.
- Speed is not important; accuracy and alignment are the key to good visual results.
As your design begins to take shape, how every part gives dimension and shine. Take breaks as needed and enjoy the process of meditating. The end result will be a glittering masterpiece that mirrors your chosen photo in a beautiful and precise way.
Step 6: Inspect, Seal, and Secure

When you are done with your canvas, take your time and look over it.
Check any misaligned drills, empty areas, or where the diamonds have not completely stuck. Tweezers can be utilized to modify or alter, where necessary. Press the entire surface with a soft cloth or rolling pin to ensure that all the drills are in place.
The second thing is to seal your painting to make it beautiful. Apply a clear, non-yellowing craft glue or brush-on sealer designed to be used with diamond art. This helps to correct the drills and gives your artwork a smooth, even finished appearance. Allow to dry and frame after.
This sealing ensures your work is not wasted and the sparkle does not become dull over time.
Step 7: Frame, Display, and Share Your Creation
Your unique custom diamond painting from photo is ready. Congratulations!
Now it’s time to display it. It can be framed in a frame of glass, or you may have a floating frame, which will give it a gallery appearance. Some individuals go further and display their work on foam boards or canvas stretchers for a more DIY display.
Your glittering masterpiece is not a decoration, but an expression of your creativity, patience, and personal story that has been turned into art.
Your Moment to Shine
Transforming a favorite photograph into a unique diamond painting is not just an art, but a process. It could be the selection of the best picture or the final diamond, but each step is satisfying and bling.
With these 7 tips, you can create an original work that is worth more than a picture.
Then choose that ideal moment, select that kit, and then begin the drills.
FAQ
1. What photo resolution do I need for a good custom diamond painting?
Images that are high-resolution and have at least 2,000 pixels on the shorter side are ideal since they retain fine details and yield clear end-result works of art.
2. How long does it take to receive my custom kit after ordering?
Orders typically take 7-14 working days, and shipping notifications are sent via email after your order has left.
3. Can I use a group photo with multiple people?
Yes. Group photos are best displayed with bigger canvas sizes since they capture facial features and other significant details in a better way.
4. What’s the difference between round and square diamond drills?
Round drills are easier to install and are friendly to beginners, whereas square drills make a more detailed, mosaic-like finish.
5. Do you offer a preview before production starts?
Yes. The customization process enables you to view and make changes to your image before making your order, to have your image in the right frame, and to be clear.